

We found a blog post Fractals in Haskell by Greg Heartsfield about generating different fractal sets using Haskell. We were especially attracted to the Julia Set and set about adapting it to our needs. We have variations on it in a couple of different colors on different pages now.
The first step was to download the source from the darcs repository. Second, we wanted to update the module layout and build process, so we revised the project layout and .cabal file, as well as initializing it as a Stack project.
We added this to our stack.yaml file so that Nix would fetch our dependencies for us:
We also modified the project’s structure a little to match our expectations for project setup that includes executables Our fork of this package along with updated installation instructions and some pretty pictures. (see below).
The original Julias
The original code had a number of settings to play with to make different variations of Julia sets. First of all, there’s the c value that, in the codebase we downloaded, had three different values, with two commented out. We should be able to get a different Julia set for each c value, so the obvious place to start our fiddling was with those values.
-- C value
c :: Complex Double
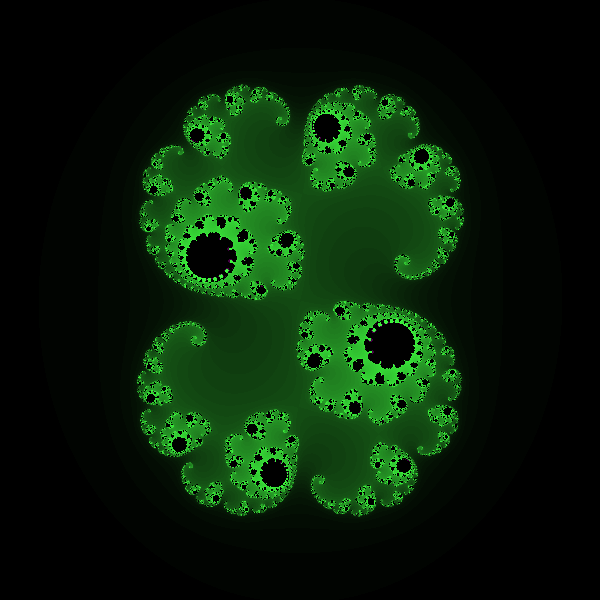
c = (-0.423) :+ 0.745 -- Dust
--c = (0.45) :+ (-0.1428)
--c = (0.285 :+ 0.01)On our first run of this program, we got this image. The output file, juliaset.png, appears in the top level of the directory you run the code in. You can change that by changing the output location in the main of juliaset.hs.

The second c value gave us this image.

And the third gave us this one, which we didn’t like at all.
So those are the basic designs we have to work with. We chose to focus on the first one, although a version of the second one appears as a header image on the site as well (for the web servers course).
We did experiment with the c values to make different patterns, some of which were lovely, like this nebulous cloud, but, as you can see, we did this after changing the colors.

A version of this image also appears as header art on the Deploying with NixOS course page, although it (like most of our images) was further processed using GIMP.
Fiddling with colors
The first three images above show the colors generated by the original code, but we wanted to change those. It took some fiddling before we were able to produce colors we wanted. The computer-green-on-black color scheme you see in the original images comes from the values passed to rgb in this function.The rgb function comes from the gd graphics library.
-- original colors
colorIterations :: Int -> Color
colorIterations x
    | x > maxIter = rgb 255 255 255
    | otherwise = let c = x*4
                  in rgb x c x
The input Int value that forms the basis of the rgb coloring comes from the julia function, which counts the number of iterations at a given point before it starts to diverge towards infinity, although in practice they are given as 0 (which maps to black color when it’s all three inputs to rgb) once there have been more than 64 iterations at a given point, because maxIter is set at 64. If you lower the maxIter value noticeably, you will notice a change in the output as more points will simply map to 0. What appears to be a black “background” color in the original images turned out not to be a “background” exactly; it’s just what happens whenever that initial Int value – which is also the x values being given to the rgb function – is 0, and as you can see, the inputs to rgb will all be 0 at some points. The green value, c, because it’s x*4 will sometimes be much greater than the other two values, for non-zero values of x, but at other times it, too, will be 0 because it’s multiplication!
So, the iteration that is key to the generation of the pattern also affects how the colors turn out, which means there are a lot of ways to alter the final image, but the inputs to rgb are the main thing that determines the actual color. By fiddling with the values of the arguments to the rgb function relative to that initial Int, we were able to get the purples and teals that we like. And the zero-ness of the Int value at some points meant that if we wanted non-black backgrounds, we’d need to find a way to keep some color even when the x value was 0.
We therefore started using addition to ensure that the rgb values never get to zero – black – at the outer edges. At first, we started with just the input called c, which only changes the green value.
colorIterations :: Int -> Color
colorIterations x
    | x > maxIter = rgb 255 255 255
    | otherwise = let c = x + 50
                  in rgb x c x
That gave us this output, which was very encouraging.

We tried all sorts of arithmetic then on those rgb values. You can, of course, make some of the settings constant, but it ruins the effects, since they are otherwise relative to each other as the number of iterations changes at different points.
We finally landed on this coloring, which was our favorite of the lot.

The next issue was then altering its size and resolution for use as a banner image.
Sizing
Finally, we did some fiddling with the numbers for the Size and Window values. The original settings were:
imageDim :: Size
imageDim = (600, 600)

-- Coordinates in the complex plane to graph
-- First coordinate must be top left.
mbWindow :: Window
mbWindow = ( (-1.5,1.5), (1.5,-1.5) ) -- Full view
Typically, adjusting only one of those can lead to a stretched and distorted image, so we had to try different settings of both of imageDim and mbWindow to get what we liked. To make the images more appropriate for our use, we settled on this.
imageDim :: Size
imageDim = (1200, 400)

mbWindow :: Window
mbWindow = ( (-3,1), (3,-1) )
That gave us this!

All in all, this is a fun package to use to generate fractal art, and we have appreciated how thorough it is.

Join Type Classes for courses and projects to get you started and make you an expert in FP with Haskell.