

Before we began writing this lesson, we thought it would be more difficult to get started with fltkhs than it proved to be. The package author, Aditya Siram, has gone out of his way to make the package complete and easy to get started with. We didn’t expect, for example, there to just be a clock; we thought we’d have to make a clock. Not only are there some built-in clock types, there is a themes package that provides a nice, if not very exciting, light theme and makes the clock look quite presentable. In this lesson, we’ll show you how to get the project started, what we did with the clock, and discuss the use of ImplicitParams to pass around the assets that constitute the light theme.
About fltkhs
fltkhsThe fltkhs package on Hackage. is a set of Haskell bindings to the FLTK GUI toolkit.The Fast Light Toolkit. FLTK itself is well documented, and it’s helpful to have their docs available for reference. The main documentation for the fltkhs package is found in the module called Graphics.UI.FLTK.LowLevel.FLTKHSThe primary documentation for the fltkhs package. – it took us a couple of minutes to notice that there is a link to that module from the README – and it’s extensive, covering installation and packaging of applications for various operating systems, as well as the motivations, goals, and basic usage of the package. It’s a lot of information; we strongly recommend taking a good look at the table of contents for that module to familiarize yourself with the topics covered. We further recommend reading at the least the first few sections about the motivations and goals of the library and the installation instructions for your operating system.
While fltkhs is a complete package with lots of options, we knew the author had lately been working on a themes package to accompany it and wanted to try that out. Currently, the fltkhs-themes packageThe fltkhs-themes package on Hackage. only has a light theme available, but there is also a little skeleton applicationThe fltkhs-light-theme-skeleton package on Github. you can use to get started, and that’s what we ended up using. If you want to follow along with the rest of this article and build the app for yourself, please begin by following his installation instructions for the skeleton app. We opted to use the skeleton app because the Setup.hs and stack.yaml in that repository give you a (relatively) fast and portable environment configuration, and at least for the purposes of this first lesson, we weren’t interested in trying to replicate that from scratch.
The skeleton app
The code in the skeleton app is short and produces a window with a single button in it. The button changes text when you click on it.You can view the original skeleton app code here.
We won’t be going through this particular code in detail, but there are a couple things about it that we want to talk about before we get into changing the code to make a clock.
- It uses two language extensions,
ImplicitParamsandOverloadedStrings, but we will only talk about the use ofImplicitParamsbelow. - It has two
mains, and one is specifically for use in the REPL.
ImplicitParams
A full discussion of what this extension is and how it works isn’t necessary here, so we’ll just focus on how it’s being used in this application. The ImplicitParams extension is not used in the fltkhs parent library but is used in the fltkhs-themes library as a reasonably lightweight way to thread a bundle of theme assets – fonts and images – through your code. The ImplicitParams extension is often compared to more common ways of setting up a global environment, such as using a ReaderT monad stack, and the package author explains why he chose ImplicitParams as part of the package documentation. The assets documentation in fltkhs-themes.
Briefly, ImplicitParams enables the mostly-implicit setting of a global context. What this means for us, the users of the package, is that we’ll see constraints that look like this:
ui :: (?assets :: Assets) => IO ()You can think of this as a typeclass constraint but for a nullary typeclass; it’s not constraining any particular variable. Instead, it sets up an environment in which we can make a bundle of things available to the whole program via the ?assets variable . The ?assets context has the type Assets, which is an opaque type that we don’t touch directly; using those assets requires threading some value of this type through the functions that draw the widgets and so forth. The ui function will have this context wherever it’s called.
In main and replMain, ?assets is assigned to a particular meaning:
Before we call ui, we call configureTheme from the light theme package to configure our fonts and button images. configureTheme does some of the work of bundling up the fonts and colors to package with the application. Once we’ve bound the ?assets parameter to the output of configureTheme then any function below in that main that has that implicit ?assets constraint on it will inherit the configured theme. In our tiny (so far) application, only ui comes after it – except that ui calls buttonCb, which also has the ?assets parameter and will be configured to use the theme assets.
replMain
If you’re accustomed to using GHCi as we are, for fast typechecking and browsing for information, then you might appreciate the provision of the replMain feature. The main action is what will execute when you call stack exec <executable name> from the command line, but if you invoke main from the REPL, the app is liable to freeze when you try to close it. On the other hand, if you call replMain, you should be able to close the app using ctrl-C and have it quit appropriately. Then you can :reload your file with any changes and call replMain again as needed.
A baby step
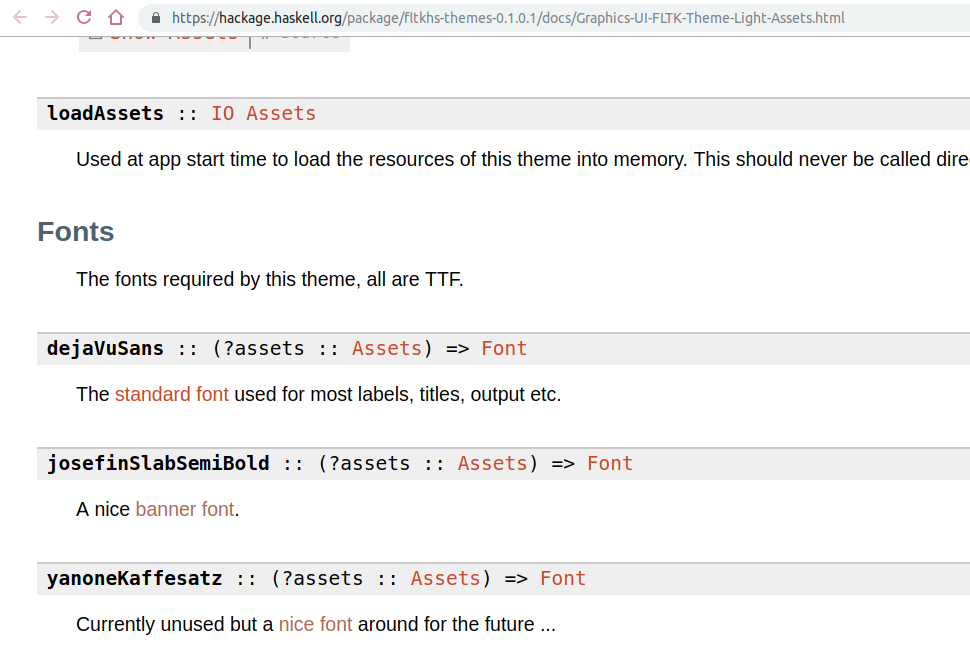
We’re going to be working with this skeleton application rather than writing our program entirely from scratch. Let’s start by exploring some of the options the fltkhs-themes package gives us. Since we were just talking about the threading of a bundle of assets through the widgets, let’s start by looking at the Assets module. One of the things we can find in the documentation is that there are three fonts bundled with the assets.
We find the description of what the button should look like in the ui function.
b' <- buttonNew
        (Rectangle (Position (X 225) (Y 180)) (Size (Width 150) (Height 40)))
        (Just "Hello world")
setLabelsize b' (FontSize 12)
Go ahead and open a stack ghci session Whether you need to use this with the bundled flag as you did when you called stack build remains an unsolved mystery. It seems likely that you do, stack ghci --flag fltkhs:bundled, possibly with a further --no-nix flag, but this is not always true in all the environments we’ve tested this in. and call replMain to see what the current widget and button look like.

Let’s try changing the font on that button from the default to the Josefin Slab SemiBold font that is one of the fonts available to us, because it’s a lovely font. We’ll go to the package index for fltkhs-themes and look for functions that set the font.

The function setLabelfont sure seems promising. It takes a Ref a, and buttonNew gives us a Ref Button so we’ll pass our button b' in as the argument. And then we assume it takes a font name, as the setLabelsize function accepted a FontSize.
b' <- buttonNew
        (Rectangle (Position (X 225) (Y 180)) (Size (Width 150) (Height 40)))
        (Just "Hello world")
setLabelfont b' josefinSlabSemiBold
setLabelsize b' (FontSize 12)
Now you should be able to :reload in the REPL, call replMain again and see that the font on the button has changed.
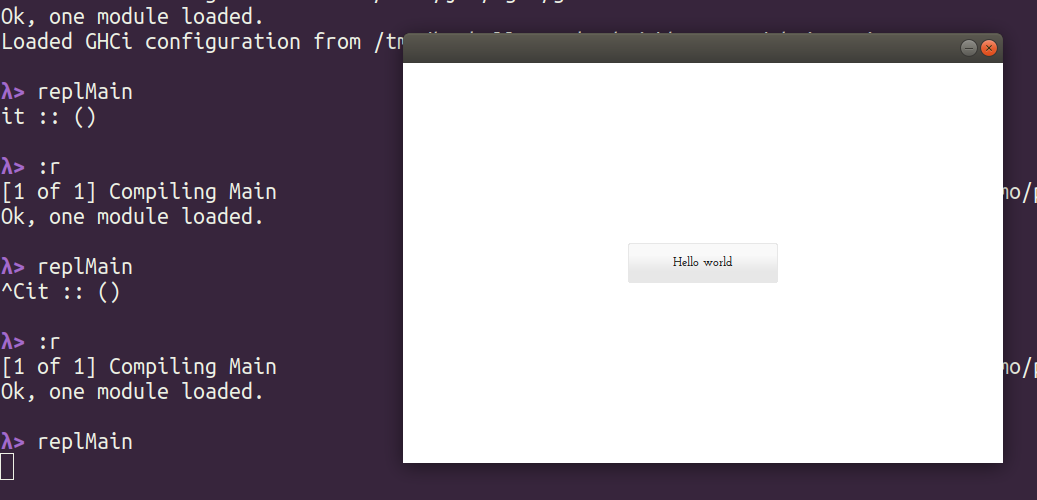
λ> :r
[1 of 1] Compiling Main
Ok, one module loaded.

λ> replMain
It’s quite tiny and hard to read now, so ctrl-C that one.
Now let’s change the FontSize to 24 and see what happens.
b' <- buttonNew
        (Rectangle (Position (X 225) (Y 180)) (Size (Width 150) (Height 40)))
        (Just "Hello world")
setLabelfont b' josefinSlabSemiBold
setLabelsize b' (FontSize 24)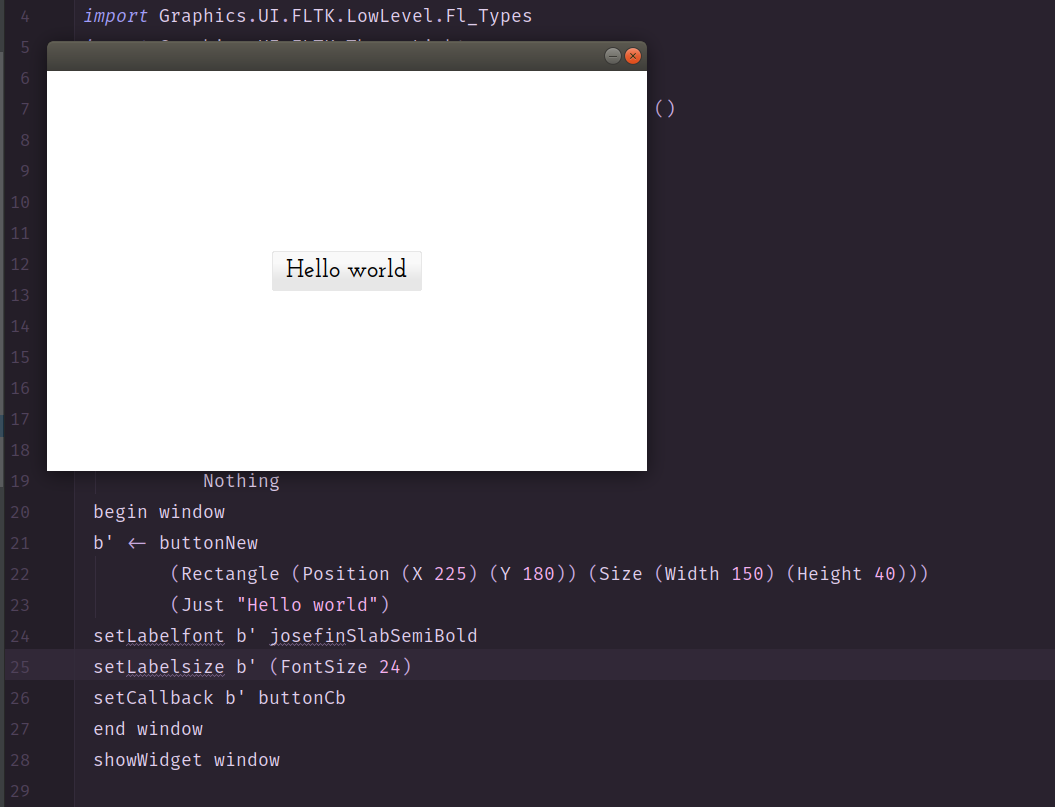
Again, reload it in GHCi and then call replMain to see the changes.
Now that we have some idea of how to play with this app, we’ll take out the button and make a clock instead.
Making a clock
Using this skeleton code, we’re going to change it from a button to a clock widget in just a couple of easy steps. In later lessons, we’ll build on it more and try implementing some more complicated features, but this will get us a clock app up and running.
First, the skeleton app that we downloaded is using windowNew to draw the window, and by poking around in the documentation, we discovered that’s a single-buffered window. We’d really like to have a double-buffered window to ensure a smooth appearance, so we’ll change that.
Second, our ui function will be drawing a clock instead of a button. So, buttonNew will need to change to … something to do with clocks.
Finally, we don’t need that buttonCb function now, as we’ll be doing away with the button, at least for now. We can delete it (or comment it out if you want to keep it around for reference).
You can follow your own sense of aesthetics as you like, but we’re going to also
- make the window smaller;
- center the clock; and
- keep the Josefin Slab font.
In the documentation for fltkhs-themes, we find a module called Graphics.UI.FLTK.Theme.Light.Window and we’re going to look there for our double-buffered window function.
doubleWindowNew :: Size -> Maybe Position -> Maybe Text -> IO (Ref DoubleWindow)We can compare that to the usage in the skeleton app code as it’s currently written and see that the Size argument needs a Width and a Height. The other two arguments, representing the Position and Text, are currently set to Nothing.
We can make a double-buffered window and change it to the size we want just by changing from windowNew to doubleWindowNew and then altering the numbers to the size we want the window to be. You may notice at this point that the window isn’t resizable; that’s something we’ll change in a future iteration. We’ll see what it looks like with the position and text arguments as Nothing first and then consider messing with them later.
So, we have a window; now we need a clock. The FLTK toolkit has some built-in clocks and the fltkhs-themes package has a module with “clock” in the name, so we’ll look there for something analogous to buttonNew but for drawing clocks.
clockNew :: (?assets :: Assets) => Rectangle -> Maybe Text -> IO (Ref Clock)It takes the ?assets constraint, a Rectangle parameter, and a Maybe Text, and creates an IO (Ref Clock). Recall that a button was a Ref Button and many of these functions, such as setLabelfont need a Ref a input. The button also had a Rectangle parameter, but we didn’t investigate it. So, let’s just go find out what a Rectangle is.
data Rectangle Constructors: Rectangle rectanglePosition :: Position rectangleSize :: Size
So, a Rectangle is a product of a Position and a Size; we already know that a Size is a product of a Width and a Height. Position is a product of two coordinates. For now, we’re not going to touch those numbers. But we do remember that the Just "Hello world" text displayed as button label, so we’re going to change that to reflect that we are making a clock now.
clock <- clockNew
(Rectangle (Position (X 225) (Y 180)) (Size (Width 150) (Height 40)))
(Just "theme clock")Without changing anything else at the moment, let’s see what that gets us. We do need to change the arguments to setLabelfont and setLabelsize from b' to clock so that they apply to our clock. We need to also remove the setCallback line, as we’re not doing that with the button anymore. So, our ui function now looks like this:
ui :: (?assets :: Assets) => IO ()
ui = do
  window <- doubleWindowNew
            (Size (Width 300) (Height 300))
            Nothing
            Nothing
  begin window
clock <- clockNew
        (Rectangle (Position (X 225) (Y 180)) (Size (Width 150) (Height 40)))
        (Just "theme clock")
setLabelfont clock josefinSlabSemiBold
setLabelsize clock (FontSize 24)
end window
showWidget windowIf you still have your REPL open, reload the file; otherwise, begin a new GHCi session. Then we call replMain and behold our new clock.
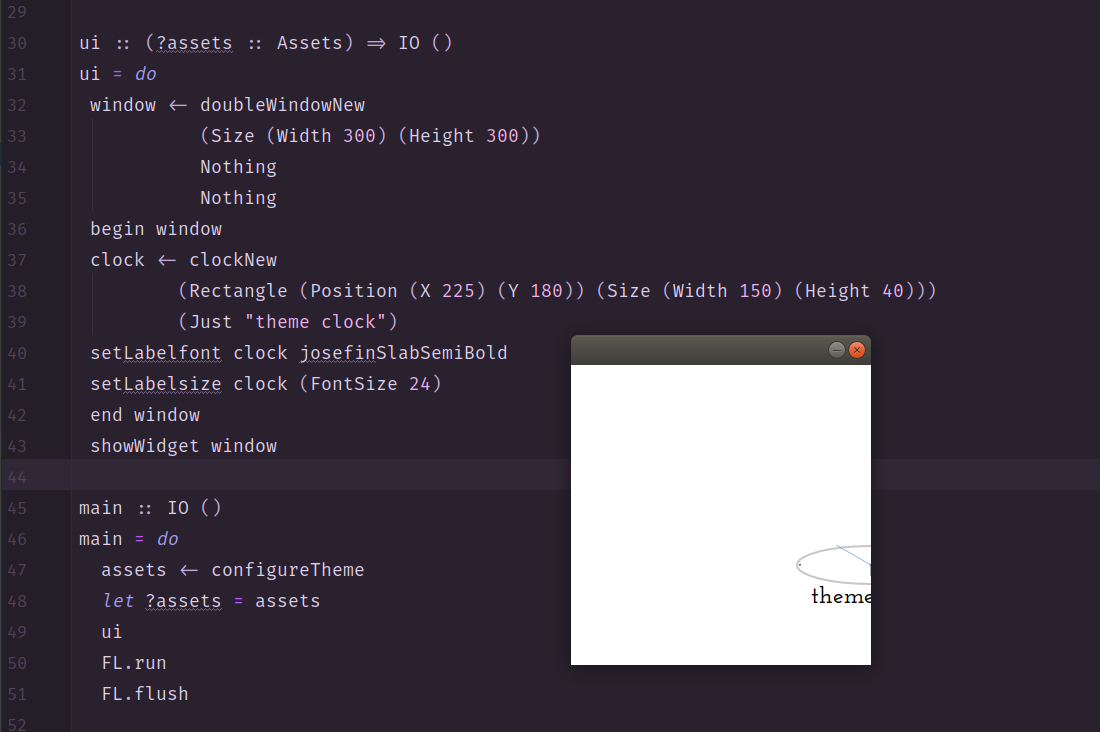
Well. It seems to work, but it’s definitely not what we want. We’ll try doing a little arithmetic and seeing if we can position the clock within the window a little more reasonably.
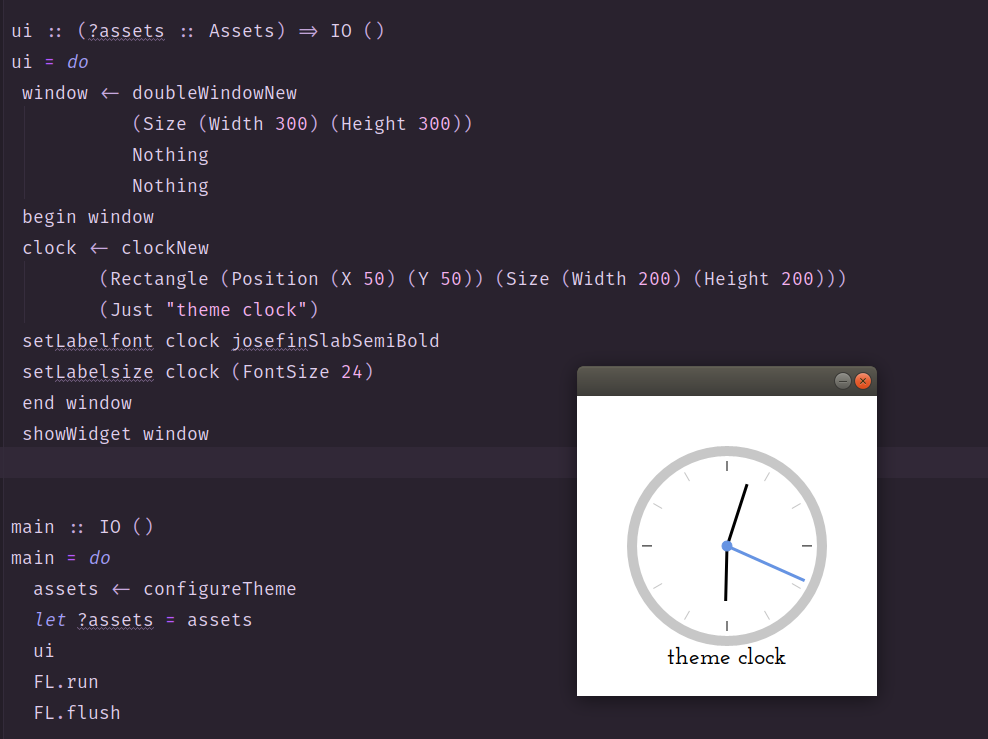
Ah, that’s more like it.
We’ll stop there for today, now that we have a working clock that is centered. One of the things that we expected to need to do for ourselves but didn’t was get the time; it seems the clock widgets offered by this package fetch the time from the system clock, and it’s bothering us that that was a little too easy. So, next time we’ll see how hard it is to make one that displays the time in a different time zone than the one our system clock is set to.
We have a repository set up for this project and will be updating it with the code from each lesson so you can download it and follow along more easily.Get the code from this lesson and future lessons in this series.
In the next lesson of this course, we’ll be getting a clock project started with gtk3.

Join Type Classes for courses and projects to get you started and make you an expert in FP with Haskell.